My Custom
Pac-Man
Arcade Cabinet 
It all began with a trip to a local arcade (ironically it was the Pakk Mann Arcade in Pasadena, CA)....
|
Playing some of the old classics was tons of fun. Even though some of the controllers weren't exactly 100% operational, there was something special about playing these games on a stand up arcade cabinet. As much as I am a fan of MAME, this was better. When I returned home from the arcade, inspiration hit - "Why not build my own MAME cabinet?" I had seen this on the Internet before. You can buy ready made MAME cabinets for about $3000- $4000 (see this link). One cabinet which plays all the old games. But that was out of my price range. But another idea came to me - what if I could resurrect an old, out of commission cabinet? And that's exactly what I did. On an internet newsgroup, I found a semi-local guy who was giving away (!!!) an old Pac-Man cabinet that had been gutted and painted white. Within a few days, I was there picking it up with a rental truck! He also gave me the original marquee and bezel, as well as new black T-molding.
|
 |
|
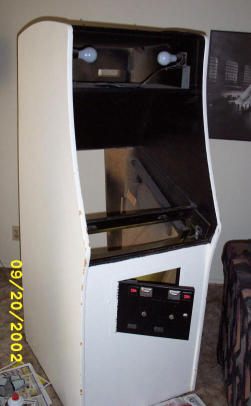
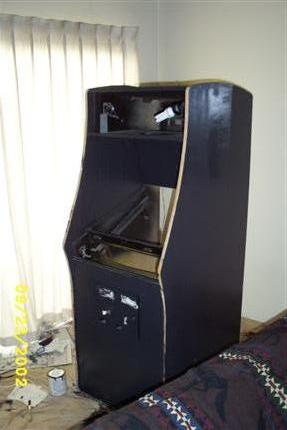
This is the condition of the cabinet when I picked it up. Nice color, eh? I tried to remove this paint to get to the original surface, but had no luck. |
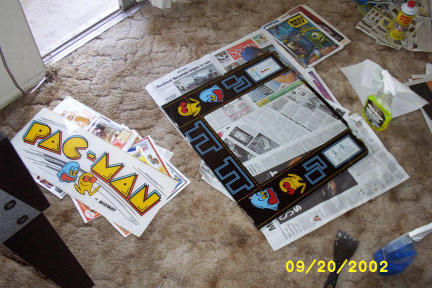
Here is the original bezel and marquee. These required some touching up. |
|
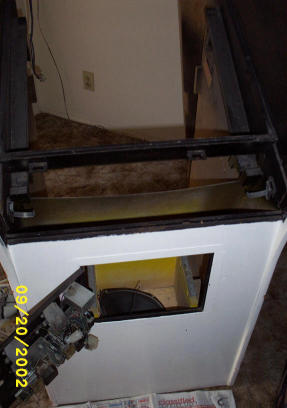
I did not receive the original control panel, but it was not needed. The coin door still has the mechanics on it, and counter! |
Here it is after removing the original T-molding and a fresh coat of paint. |
|
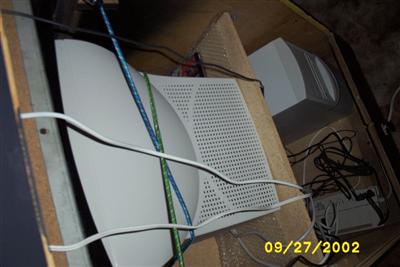
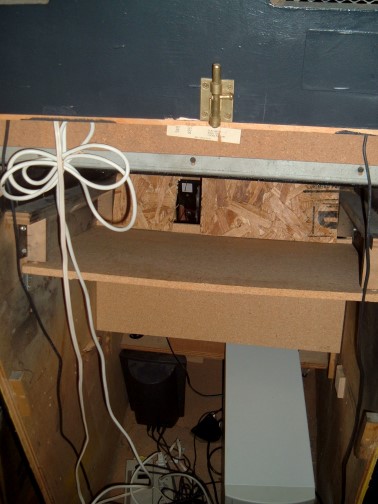
I had to attack from two fronts at the same time : refitting the wooden cabinet, and building a custom computer for MAME purposes. I did some bargain hunting, and picked up some good deals. I also had some parts laying around. I ended up with a Soyo motherboard and case kit from Frys, an Athlon 1.7 XP, 20 GIG hard drive (later upgraded to 200 GB) , Logitech 2.1 speakers, cordless keyboard, Logitech trackball. Initially I installed Windows 98 because the spare video card I had would not work under WIN XP. I later upgraded to a GeForce 4 4200 , and also upgraded to WIN XP. I found out WIN XP runs like a dog unless you have 256 MB. I ended up buying a 17" CRT monitor. I would have love to have something bigger, but the Pac Man bezel restricted me. (See below for a later upgrade from CRT to 19 " LCD) Since I have worked with computers for years, that part was pretty easy for me. Re-engineering the cabinet was a bit more tough. There was no way I could remove the ugly white paint without also removing the original artwork beneath it. I decided to sand it down, and paint over it. The original cabinet has yellow sides, but since this was going in my living room, I chose to paint it black. After several coats of semi-gloss, I realized that it required a matte finish paint. Once it was painted, I hooked up a new marquee light (and mounted a switch under it). I also mounted the new speakers behind the marquee. I then constructed a new monitor shelf (I made the mistake of using particle board - I don't recommend this). The monitor, speakers, and computer and not permanently mounted. They are easily removable so the cabinet can be moved easier.
|
 Just unhook the bungee cords, and you can easily remove the monitor |
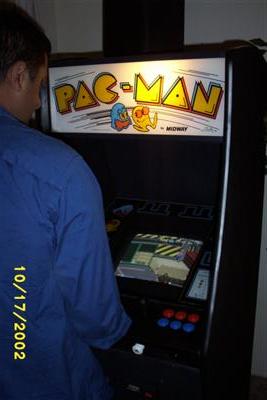
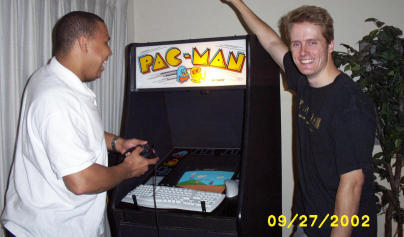 "Beta One" was a playable version with keyboard, mouse, and gamepad. Here is Stoney Face having a blast. |
|
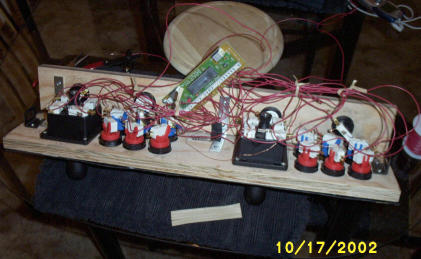
The "Beta One" version of the cabinet did not have the final control panel. I made a temporary one which held the keyboard and mouse. It was a little awkward, but it was playable! Even without the cool controls, MAME was better. It felt right. It sounded right. I was already pleased. But I could hardly rest, as I had to build the control panel! I was limited by the size of the Pac-Man cabinet, so I knew I could not go as crazy as some others on the web. I decided to go with a common configuration : two joysticks, with six buttons next to each. This would cover recent fighting games, as well as one-button games like Galaga. The key to success with this is a cool device called the I-PAC. It allows you to interface home built arcade controllers with a USB PC! It is cheap and easy to use. Once I had the IPAC, and ordered my controllers from HAPP CONTROLS, it was time to drill and wire... |
|
The mess of wiring and the IPAC interface |
PD puts the finished controls to a test |
|
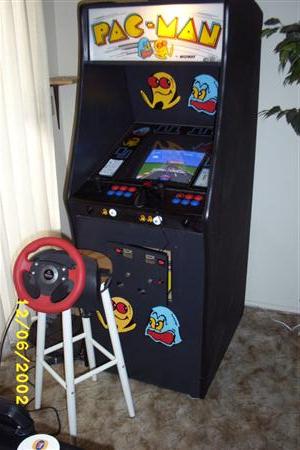
Cabinet with Trackball and Steering Wheel
|
The wiring is still not
foolproof even to this day, but it does the trick. The controls rock.
They are pro quality and should last a long time. For games like Tron and
Tempest which are best with a spinner, the Trackball can be
used. The optional steering wheel plugs into a USB hub which is accessible
through the front door. For games like Robotron, Tapper, and Stargate,
which have unique controls, I remapped MAME so they are just like their
arcade counterparts.
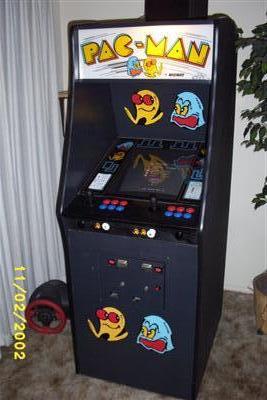
By the way, I wired a pushbutton switch on the door which is used to add credits - highly recommended! I have also mounted quarters on the marquee to re-create the "I have next game" move. I added the Pac-Man and Ghost images to give it a more arcadeish look I continue to tweak (see below for my LCD upgrade and more) and upgrade the cabinet. It is one of the coolest things I have ever done.
|
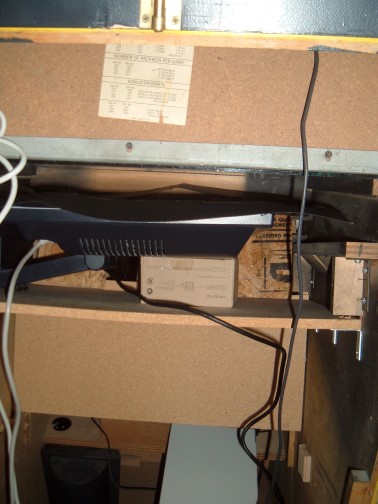
Replacing the CRT with a much thinner LCD required raising the platform that the monitor rest on several inches. |
Here is the new LCD in the cabinet - it is mounted sideways so it runs vertical (PacMan style). The box you can see is just raising the LCD up so it is "flat" - a black construction paper bezel sits on top of the monitor. |
|
After upgrading my main PC to a 22" LCD screen, I decided to move my older 19" LCD to the Pac Man Cabinet - this would increase the screen size of the Pac Man, use less power, and the cabinet would be considerable lighter. But besides physical modification of the cabinet, this added one large challenge: I would have to adjust everything to display properly. One thing I immediately noticed: my Nvidia 6600 series card was performing very sluggishly when I used its built-in monitor rotation function. After a good amount of troubleshooting and research on the web, I discovered that when you rotate most if not all Nvidia cards, you lose video acceleration! Well, that meant bye bye Nvidia and Hello ATI. Got an x1650 card on clearance at Best Buy- it runs perfectly when rotated. Other things performed due to screen rotation: Creation of vertical wallpaper, replacing Windows boot and login screens with ones that run vertical (made custom login). Thanks to Stardocks "Object Desktop" the entire is interface is skinned so it is difficult to know you are dealing with a WIN XP machine. |
Q&A
1. If you're not using the speakers that came
with the cabinet, where did you put them and how does it sound?
I
covered the original speaker hole in the cabinet (mono), and drilled small holes
for the sound to go through. These holes are underneath the marquee. I used
brackets to mount the speakers inside the marquee area. I used a Logitech 3
piece set. The subwoofer is in the bottom of the cabinet, and makes a huge
difference. They are all easily removable.
2. Is the computer you're running for MAME
automatically booting up with the program upon startup, or do you have to select
the program from the Desktop?
MAME is in my
startup group, so it does run upon startup. I have it so the computer boots up
upon any keyboard key press (set in the bios). This makes it possible to run the
computer without access to it.
3. Do you have a keyboard attached somewhere
inside the cabinet, or all Windows functions done from the arcade controller?
Most of the
functions are achieved using the I-Pac programmable shortcuts. I also have a
cordless keyboard which I built a shelf for on a nearby wall.
4. What's better, using a computer monitor, or an
arcade cabinet television (sure it depends on when the cabinet TV was made, but
it's just something I've been deciding between).
I highly
recommend a VGA computer monitor, as you are guaranteed it will run most
resolutions at various refresh rates. You will also get a much higher quality
picture. If you wish to have scan lines like the original cabinets, you can use
a setting in MAME to simulate. I also made it so the monitor is easily removable
(like the rest of the components) so moving the cabinet is not a big deal. (See
above for LCD monitor upgrade)
4a. What's more cost efficient between the two
different monitors?
Well, you may
be able to pick up an Arcade monitor for the cheap, but it will be much more
difficult to use. I believe most will require ADVANCE MAME which has different
settings for arcade monitors.
5. Do you play standing up, or do you have barstools like arcade/pizza places used to have?
Yes, I do have a bar stool. Besides just sitting on it, I can also use the bar stool to mount the optional steering wheel as well.
|
HELPFUL LINKS: http://www.arcadeathome.com/controller.phtml - Arcade @ Home Controller info http://groups.google.com/groups?oi=djq&as_ugroup=rec.games.video.arcade.marketplace - Google board where I found my cabinet http://www.happcontrols.com/ - Happ Controls http://www.arcadecontrols.com/arcade.htm - great info on control panels http://www.ultimarc.com/ipac1.html - Home of the I-PAC http://www.stardock.com/products/odnt/- Stardock Object Desktop - great for "skinning" and customizing you cabinet Windows. http://www.wincustomize.com/skins.aspx?skinid=52&libid=69 - An arcade sound scheme I created for Soundpackager.
|
To Emulator Links Return to Main Menu
![]()